||
实验环境:CentOS 7 VMware 虚拟机,GreatSQL 8.0
[root@master ~]# cat /etc/system-release
CentOS Linux release 7.9.2009 (Core)
我用的是 VMware 虚拟机,装好一台后克隆出另外一台。这样子操作有几个注意事项,这种需要修改新克隆出来主机的:①MAC地址②hostname③IP 地址④UUID。
有俩种方法可以改:
#查看UUID 记录一下NAME
[root@slave ~]# nmcli con show
NAME    UUID                                  TYPE      DEVICE
ens33   049a7985-532c-4bdb-a1a9-2c00f188ad01  ethernet  ens33
virbr0  1521f0cc-95c5-451b-82c1-8d9177398818  bridge    virbr0

#修改 UUID
[root@slave ~]# uuidgen ens33
9f393aaf-5fa5-4efc-a6c0-4beddb582147

#也可以直接修改这个 ifcfg开头的文件
/etc/sysconfig/network-scripts/ifcfg-***

#修改完重启一下网络
systemctl restart network
修改主机和从机的主机名,为了更好的区分俩台机器。
#修改主机的主机名为 master
hostnamectl set-hostname master
#重启
reboot

#修改从机的主机名为 slave
hostnamectl set-hostname slave
#重启
reboot

#检查是否修改成功
[root@master ~]#  cat /etc/hostname
master
此步骤可省略,这里添加 hosts 记录,互相给给对方的主机名做解析。要是机器的 IP 地址有变动直接改 hosts 文件就行。
#修改主机hosts文件
 vim /etc/hosts

#在主机的hosts里添加从机的记录
192.168.*.* slave1

#ping 一下检查是否添加成功
[root@master log_bin]# ping slave1
PING slave1 (192.168.234.137) 56(84) bytes of data.
64 bytes from slave1 (192.168.234.137): icmp_seq=1 ttl=64 time=0.853 ms


#修改从机hosts文件
 vim /etc/hosts
#在从机的hosts里添加主机的记录
192.168.*.* master

#ping 一下检查是否添加成功
[root@slave ~]# ping master
PING master (192.168.234.138) 56(84) bytes of data.
64 bytes from master (192.168.234.138): icmp_seq=1 ttl=64 time=0.432 ms
在克隆的时候 MySQL 的 UUID 也会一起克隆过去,所以要手动修改一下 MySQL 的UUID 。
#UUID存放在data文件夹的auto.cnf文件里,具体位置要看MySQL的设置
vim /usr/local/mysql/data/auto.cnf


#select uuid()  执行命令重置uuid的值
root@localdomain 14:10:  [(none)]> select uuid();
+--------------------------------------+
| uuid()                               |
+--------------------------------------+
| ea00a4a8-3d61-11ed-b267-000c2992ef3e |
+--------------------------------------+
1 row in set (0.00 sec)

#确认一下 UUID 是否已经修改
cat /usr/local/mysql/data/auto.cnf

[auto]
server-uuid=0c9947c8-38f6-11ed-a3ba-000c2933715c
在主机的 my.cnf 文件添加如下配置:
[mysqld]
server-id=1

#文件保存目录
log_bin = /usr/local/mysql/data/mybinlog

#[可选]设置binlog格式
binlog_format=ROW
在主机的 my.cnf 文件添加如下配置:
server-id=2
relay-log=mysql-relay
[mysqld]参考配置如下:
#[必须]主服务器唯一ID
server-id=1

#[必须]启用二进制日志,指名路径。比如:自己本地的路径/log/mysqlbin
log-bin=atguigu-bin


#[可选] 0(默认)表示读写(主机),1表示只读(从机)
read-only=0

#设置日志文件保留的时长,单位是秒
binlog_expire_logs_seconds=6000

#控制单个二进制日志大小。此参数的最大和默认值是1GB
max_binlog_size=200M

#[可选]设置不要复制的数据库
binlog-ignore-db=test

#[可选]设置需要复制的数据库,默认全部记录。比如:binlog-do-db=atguigu_master_slave
binlog-do-db=需要复制的主数据库名字

#[可选]设置binlog格式
binlog_format=STATEMENT
在主机创建用于从机用于读取 binlog 的账户
# 创建用户
root@localdomain 19:57:  [(none)]> CREATE USER 'slave1'@'%' IDENTIFIED BY 'password';
Query OK, 0 rows affected (0.02 sec)

# 赋予权限
root@localdomain 19:58:  [(none)]> GRANT REPLICATION SLAVE ON *.* TO 'slave1'@'%';
Query OK, 0 rows affected (0.00 sec)

# 查看权限
root@localdomain 20:03:  [(none)]> show grants for 'slave1'@'%';
+------------------------------------------------+
| Grants for slave1@%                            |
+------------------------------------------------+
| GRANT REPLICATION SLAVE ON *.* TO `slave1`@`%` |
+------------------------------------------------+
1 row in set (0.00 sec)

#修改slave1账户的登录验证方式(不推荐)
root@localdomain 20:03:  [(none)]> ALTER USER 'slave1'@'%' IDENTIFIED WITH mysql_native_password BY 'GreatSQL@2022';
Query OK, 0 rows affected (0.00 sec)

# 刷新权限
flush privileges;
有的教程会在这里选择修改登录验证...当不推荐,mysql官方。。。。
查询主 master 的状态,并记录下File和Position的值。二进制日志名和偏移变量
root@localdomain 20:04:  [(none)]> show master status;
+-----------------+----------+--------------------------------------------+
| File            | Position | Executed_Gtid_Set                          |
+-----------------+----------+--------------------------------------------+
| mybinlog.000028 |     1176 | 824a1475-21c1-11ed-b85d-000c2992ef3e:1-301 |
+-----------------+----------+--------------------------------------------+
1 row in set (0.00 sec)
自持主机就不要再进行操作了 避免 二进制日志名和偏移量值发生改变
MySQL 8.0 默认使用基于 RSA 的非对称加密 caching_sha2_password ,在配置主从复制之前,要先让从机获取一下主机的公钥。
MySQL 8.0 使用了 基于RSA的非对称加密,要先获取一下主机的公钥 MySQL8.0的密码插件
1.在从机上登录主机
mysql -u slave1 -p123456 -h master --get-server-public-key
对数据库的服务器做响应的设置:
网络上多数教程都是CHANGE MASTER,但是这种写法即将被弃用,使用的时候也会报 warning 所以推荐使用 CHANGE REPLICATION SOURC
CHANGE REPLICATION SOURCE TO
SOURCE_HOST='主机的IP地址',
SOURCE_PASSWORD='主机用户名',
SOURCE_PASSWORD='主机用户名的密码',
SOURCE_LOG_FILE='mybinlog日志名',
SOURCE_LOG_POS=偏移量值;
填写示例:
SOURCE_LOG_FILE 和 SOURCE_LOG_POS 根据上文的 master status 来填
CHANGE REPLICATION SOURCE TO
SOURCE_HOST='master',
SOURCE_PASSWORD='slave1',
SOURCE_PASSWORD='password',
SOURCE_LOG_FILE='mybinlog.000028',
SOURCE_LOG_POS=1176;
很多找到的教程都是用 START SLAVE 启动服务的,实际启用的时候发现 MySQL 报了 warning 。START SLAVE将弃用,推荐使用 START REPLICA
MySQL 8.0 默认的认证方式为 caching_sha2_password,要在START REPLICA时指定 caching_sha2_password,详见如下:
#启动slave线程,指定加密方式
mysql> START REPLICA DEFAULT_AUTH='caching_sha2_password';
Query OK, 0 rows affected (0.09 sec)
查看主从复制是否搭建成功,Slave_IO_Running和Slave_SQL_Running 是 yes 就说明成功了。
root@localdomain 20:50:  [(none)]> show slave status\G
*************************** 1. row ***************************
               Slave_IO_State: Waiting for master to send event
                  Master_Host: master
                  Master_User: slave1
                  Master_Port: 3306
                Connect_Retry: 60
              Master_Log_File: mybinlog.000032
          Read_Master_Log_Pos: 764
               Relay_Log_File: mysql-relay.000002
                Relay_Log_Pos: 323
        Relay_Master_Log_File: mybinlog.000032
             Slave_IO_Running: Yes
            Slave_SQL_Running: Yes
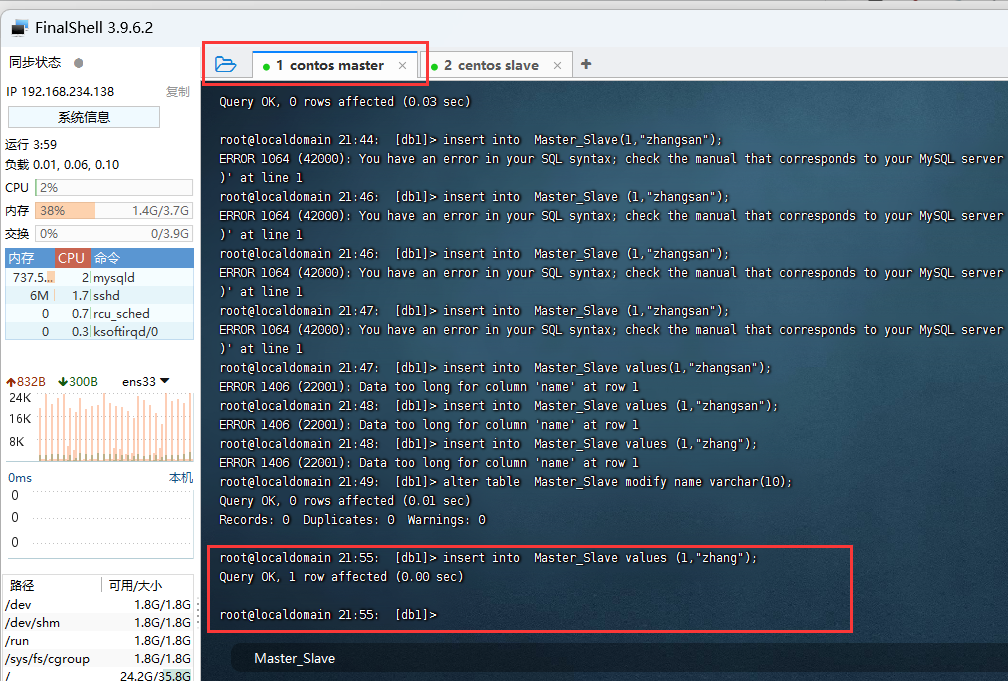
主机插入数据
create table Master_Slave (id int ,name varchar(10),primary key (id));
root@localdomain 21:55:  [db1]> insert into  Master_Slave values (1,"zhang");
Query OK, 1 row affected (0.00 sec)
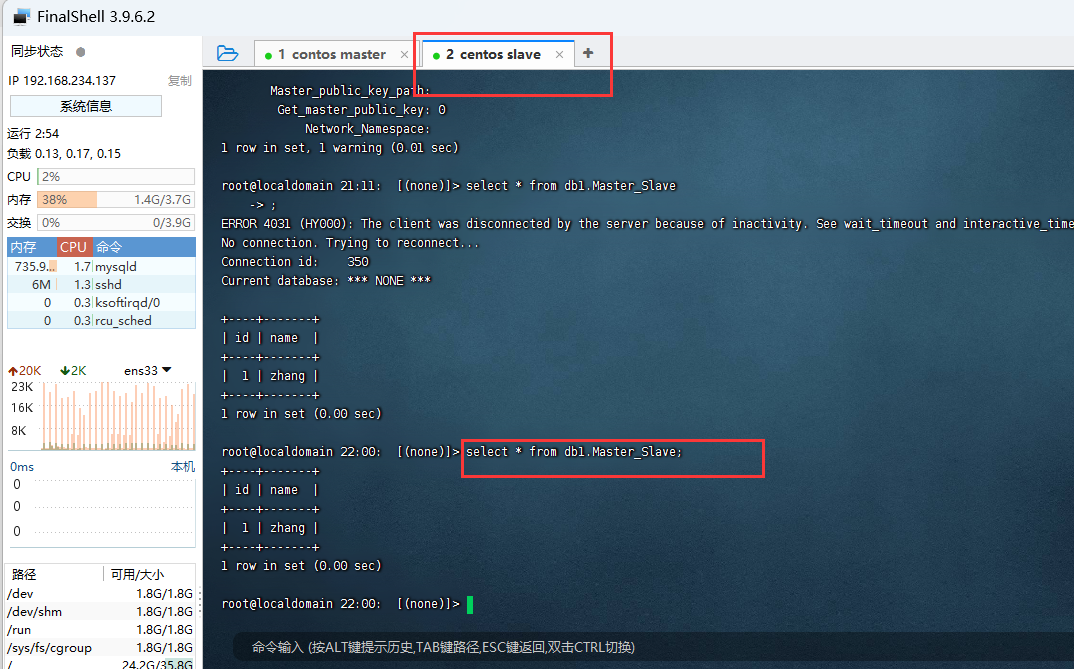
从机查询
root@localdomain 22:00:  [(none)]> select * from db1.Master_Slave;
+----+-------+
| id | name  |
+----+-------+
|  1 | zhang |
+----+-------+
1 row in set (0.00 sec)
#1.登陆
mysql -uroot -p

#2.下载插件
install plugin rpl_semi_sync_master soname 'semisync_master.so';

#3.检查是否安装插件
show plugins;
#3.1有如下就算成功
rpl_semi_sync_master  | ACTIVE   | REPLICATION  | semisync_master.so | GPL  |

#4.打开设置
set global rpl_semi_sync_master_enabled=on;
install plugin rpl_semi_sync_slave soname 'semisync_slave.so';

show plugins;

set global rpl_semi_sync_slave_enabled=on;

#重启从库的IO线程
stop slave io_thread;
start slave io_thread;
root@localdomain 22:27:  [db1]> show global status like '%semi%';
+--------------------------------------------+-------+
| Variable_name                              | Value |
+--------------------------------------------+-------+
| Rpl_semi_sync_master_clients               | 1     |
| Rpl_semi_sync_master_net_avg_wait_time     | 0     |
| Rpl_semi_sync_master_net_wait_time         | 0     |
| Rpl_semi_sync_master_net_waits             | 0     |
| Rpl_semi_sync_master_no_times              | 0     |
| Rpl_semi_sync_master_no_tx                 | 0     |
| Rpl_semi_sync_master_status                | ON    |
| Rpl_semi_sync_master_timefunc_failures     | 0     |
| Rpl_semi_sync_master_tx_avg_wait_time      | 0     |
| Rpl_semi_sync_master_tx_wait_time          | 0     |
| Rpl_semi_sync_master_tx_waits              | 0     |
| Rpl_semi_sync_master_wait_pos_backtraverse | 0     |
| Rpl_semi_sync_master_wait_sessions         | 0     |
| Rpl_semi_sync_master_yes_tx                | 0     |
+--------------------------------------------+-------+
14 rows in set (0.00 sec)
root@localdomain 22:29:  [(none)]> show global status like 'Rpl_semi_sync_slave_status';
+----------------------------+-------+
| Variable_name              | Value |
+----------------------------+-------+
| Rpl_semi_sync_slave_status | ON    |
+----------------------------+-------+
1 row in set (0.00 sec)
从节点上
# 创建用户
mysql> CREATE USER 'master1'@'%' IDENTIFIED BY 'password';
Query OK, 0 rows affected (0.01 sec)
# 赋予权限
GRANT REPLICATION SLAVE ON *.* TO 'master1'@'%';
# 查看权限
mysql> show grants for 'master1'@'%';
+-------------------------------------------------+
| Grants for master1@%                            |
+-------------------------------------------------+
| GRANT REPLICATION SLAVE ON *.* TO `master1`@`%` |
+-------------------------------------------------+
1 row in set (0.00 sec)


# 刷新权限
flush privileges;

查询Master的状态,并记录下File和Position的值。

mysql> show master status;
+-----------------+----------+-------------------+------------------+-------------------+
| File            | Position | Binlog_Do_DB      | Binlog_Ignore_DB | Executed_Gtid_Set |
+-----------------+----------+-------------------+------------------+-------------------+
| test-bin.000001 |     1136 | test_master_slave |                  |                   |
+-----------------+----------+-------------------+------------------+-------------------+
1 row in set (0.01 sec)

至此,不要再动从机,以免服务器状态变化
root@localdomain 22:31:  [(none)]> CREATE USER 'master1'@'%' IDENTIFIED BY 'GreatSQL@2022';
ERROR 4031 (HY000): The client was disconnected by the server because of inactivity. See wait_timeout and interactive_timeout for configuring this behavior.
No connection. Trying to reconnect...
Connection id:    396
Current database: *** NONE ***

Query OK, 0 rows affected (0.02 sec)

root@localdomain 22:44:  [(none)]> GRANT REPLICATION SLAVE ON *.* TO 'master1'@'%';
Query OK, 0 rows affected (0.00 sec)

root@localdomain 22:44:  [(none)]> show grants for 'master1'@'%';
+-------------------------------------------------+
| Grants for master1@%                            |
+-------------------------------------------------+
| GRANT REPLICATION SLAVE ON *.* TO `master1`@`%` |
+-------------------------------------------------+
1 row in set (0.00 sec)

root@localdomain 22:44:  [(none)]> ALTER USER 'master1'@'%' IDENTIFIED WITH mysql_native_password BY 'GreatSQL@2022';
Query OK, 0 rows affected (0.00 sec)

root@localdomain 22:44:  [(none)]> flush privileges;
Query OK, 0 rows affected (0.01 sec)

root@localdomain 23:13:  [(none)]> show master status;
+-----------------+----------+----------------------------------------------------------------------------------------------+
| File            | Position | Executed_Gtid_Set                                                                            |
+-----------------+----------+----------------------------------------------------------------------------------------------+
| mybinlog.000027 |      196 | 0a39a69d-3d99-11ed-9d1f-000c29bd787b:1-4,824a1475-21c1-11ed-b85d-000c2992ef3e:1-297:302-304  |
+-----------------+----------+----------------------------------------------------------------------------------------------+
1 row in set (0.00 sec)
log_bin = /usr/local/mysql/data/mybinlog
binlog_format=ROW
mysql -umaster1 -pGreatSQL@2022

START REPLICA;

CHANGE REPLICATION SOURCE TO
SOURCE_HOST='slave1',
SOURCE_PASSWORD='master1',
SOURCE_PASSWORD='GreatSQL@2022',
SOURCE_LOG_FILE='mybinlog.000028',
SOURCE_LOG_POS=196;

CHANGE MASTER TO
MASTER_HOST='slave1',
MASTER_USER='master1',
MASTER_PASSWORD='GreatSQL@2022',
MASTER_LOG_FILE='mybinlog.000028',
MASTER_LOG_POS=196;
root@localdomain 23:21:  [(none)]> show slave status\G
*************************** 1. row ***************************
               Slave_IO_State: Waiting for master to send event
                  Master_Host: master
                  Master_User: slave1
                  Master_Port: 3306
                Connect_Retry: 60
              Master_Log_File: mybinlog.000030
          Read_Master_Log_Pos: 1002
               Relay_Log_File: mysql-relay.000005
                Relay_Log_Pos: 323
        Relay_Master_Log_File: mybinlog.000030
             Slave_IO_Running: Yes
            Slave_SQL_Running: Yes
1062错误——主键冲突,出现这种情况就是从库出现插入操作,主库又插入相同的数据,iothread没问题,sqlthread出错。
处理此种错误一般有两种思路:
1、直接跳过错误执行语句
2、找到错误执行语句,修复主库2数据
mysql> create table test(id int PRIMARY KEY ,name varchar(32));
Query OK, 0 rows affected (0.06 sec)

mysql> insert into  Master_Slave values (1,"zhang");
Query OK, 1 row affected (0.00 sec)
从机查询数据
root@slave [db1]> select * from db1.master_slave;
+----+-------+
| id | name  |
+----+-------+
|  1 | zhang |
+----+-------+
1 row in set (0.00 sec)
主机查询数据
root@master 12:03:  [db1]>  select * from db1.master_slave;
+----+-------+
| id | name  |
+----+-------+
|  1 | zhang |
+----+-------+
1 row in set (0.01 sec
#插入数据
root@slave [db1]> insert into  Master_Slave values (2,"li");
Query OK, 1 row affected (0.00 sec)

#查询
root@slave [db1]> select * from db1.master_slave;
+----+-------+
| id | name  |
+----+-------+
|  1 | zhang |
|  2 | li    |
+----+-------+
2 rows in set (0.00 sec)
root@localdomain 12:04:  [db1]> insert into  Master_Slave values (2,"li");
Query OK, 1 row affected (0.02 sec)
主机插入了一条从机已经存在的数据,只要让从机忽略这条即可。
查看报错信息
root@localdomain 12:04:  [db1]> SHOW slave STATUS\G
*************************** 1. row ***************************
               Slave_IO_State: Waiting for master to send event
                  Master_Host: master
                  Master_User: slave1
                  Master_Port: 3306
                Connect_Retry: 60
              Master_Log_File: mybinlog.000030
          Read_Master_Log_Pos: 1359
               Relay_Log_File: mysql-relay.000004
                Relay_Log_Pos: 323
        Relay_Master_Log_File: mybinlog.000030
             Slave_IO_Running: Yes
            Slave_SQL_Running: No
                   Last_Errno: 1062
                   Last_Error: Coordinator stopped because there were error(s) in the worker(s). The most recent failure being: Worker 1 failed executing transaction '824a1475-21c1-11ed-b85d-000c2992ef3e:305' at master log mybinlog.000030, end_log_pos 1328. See error log and/or performance_schema.replication_applier_status_by_worker table for more details about this failure or others, if any.
                 Skip_Counter: 0
          Exec_Master_Log_Pos: 1002
              Relay_Log_Space: 885
              Until_Condition: None

        Seconds_Behind_Master: NULL
Master_SSL_Verify_Server_Cert: No
                Last_IO_Errno: 0
                Last_IO_Error:
               Last_SQL_Errno: 1062
               Last_SQL_Error: Coordinator stopped because there were error(s) in the worker(s). The most recent failure being: Worker 1 failed executing transaction '824a1475-21c1-11ed-b85d-000c2992ef3e:305' at master log mybinlog.000030, end_log_pos 1328. See error log and/or performance_schema.replication_applier_status_by_worker table for more details about this failure or others, if any.
  Replicate_Ignore_Server_Ids:
             Master_Server_Id: 1
                  Master_UUID: 824a1475-21c1-11ed-b85d-000c2992ef3e
             Master_Info_File: mysql.slave_master_info
                    SQL_Delay: 0
          SQL_Remaining_Delay: NULL
      Slave_SQL_Running_State:
           Master_Retry_Count: 86400
                  Master_Bind:
      Last_IO_Error_Timestamp:
     Last_SQL_Error_Timestamp: 220930 12:04:54
           Retrieved_Gtid_Set: 824a1475-21c1-11ed-b85d-000c2992ef3e:305
            Executed_Gtid_Set: 0a39a69d-3d99-11ed-9d1f-000c29bd787b:1,
824a1475-21c1-11ed-b85d-000c2992ef3e:1-297:302-304
                Auto_Position: 0
        Get_master_public_key: 0
            Network_Namespace:
1 row in set, 1 warning (0.00 sec)
提取出关键信息
Slave_SQL_Running: No

Last_SQL_Errno: 1062
Last_SQL_Error: Coordinator stopped because there were error(s) in the worker(s). The most recent failure being: Worker 1 failed executing transaction '824a1475-21c1-11ed-b85d-000c2992ef3e:305' at master log mybinlog.000030, end_log_pos 1328. See error log and/or performance_schema.replication_applier_status_by_worker table for more details about this failure or others, if any.

Executed_Gtid_Set: 0a39a69d-3d99-11ed-9d1f-000c29bd787b:1,
stop replica;
set global sql_slave_skip_counter=1;
start replica;


#报错:ERROR 1858 (HY000): sql_slave_skip_counter can not be set when the server ......
发现没有效果,采用下面的方式修复:
stop replica;

#在session里设置gtid_next,即跳过这个GTID
SET @@SESSION.GTID_NEXT= '824a1475-21c1-11ed-b85d-000c2992ef3e:305'

#设置空事物,也可以直接设置GTID+1
BEGIN; COMMIT;

#恢复GTID
SET SESSION GTID_NEXT = AUTOMATIC;
start replica;
root@localdomain 12:46:  [db1]> STOP SLAVE;
Query OK, 0 rows affected, 1 warning (0.00 sec)

root@localdomain 12:47:  [db1]> SET @@SESSION.GTID_NEXT= '824a1475-21c1-11ed-b85d-000c2992ef3e:305'  ;
Query OK, 0 rows affected (0.00 sec)

root@localdomain 12:47:  [db1]> BEGIN; COMMIT;
Query OK, 0 rows affected (0.00 sec)

Query OK, 0 rows affected (0.01 sec)

root@localdomain 12:47:  [db1]> SET SESSION GTID_NEXT = AUTOMATIC;
Query OK, 0 rows affected (0.00 sec)

root@localdomain 12:47:  [db1]> start SLAVE;
Query OK, 0 rows affected, 1 warning (0.09 sec)


root@localdomain 12:47:  [db1]> show slave status \G
*************************** 1. row ***************************
               Slave_IO_State: Waiting for master to send event
                  Master_Host: master
                  Master_User: slave1
                  Master_Port: 3306
                Connect_Retry: 60
              Master_Log_File: mybinlog.000030
          Read_Master_Log_Pos: 1359
               Relay_Log_File: mysql-relay.000009
                Relay_Log_Pos: 363
        Relay_Master_Log_File: mybinlog.000030
             Slave_IO_Running: Yes
            Slave_SQL_Running: Yes
参考资料
MySQL主从复制中的问题(Coordinator stopped beacause there were errors in the workers.....
MySQL主从复制之半同步(semi-sync replication)
MySQL主从复制
主从复制报错2061:Authentication plugin 'caching_sha2_password' reported error:Authentication require secure connection
合作电话:010-64087828
社区邮箱:greatsql@greatdb.com