||
译注:cstack在github维护了一个简单的、类似sqlite的数据库实现,通过这个简单的项目,可以很好的理解数据库是如何运行的。本文是第十二篇,主要是实现扫描多级B-Tree
我们现在支持构建一个多级B-Tree,但是我们在程序中破坏了 select 语句。下面是一个插入15行数据并打印出来的测例。
  +  it 'prints all rows in a multi-level tree' do
  +    script = []
  +    (1..15).each do |i|
  +      script << "insert #{i} user#{i} person#{i}@example.com"
  +    end
  +    script << "select"
  +    script << ".exit"
  +    result = run_script(script)
  +
  +    expect(result[15...result.length]).to match_array([
  +      "db > (1, user1, person1@example.com)",
  +      "(2, user2, person2@example.com)",
  +      "(3, user3, person3@example.com)",
  +      "(4, user4, person4@example.com)",
  +      "(5, user5, person5@example.com)",
  +      "(6, user6, person6@example.com)",
  +      "(7, user7, person7@example.com)",
  +      "(8, user8, person8@example.com)",
  +      "(9, user9, person9@example.com)",
  +      "(10, user10, person10@example.com)",
  +      "(11, user11, person11@example.com)",
  +      "(12, user12, person12@example.com)",
  +      "(13, user13, person13@example.com)",
  +      "(14, user14, person14@example.com)",
  +      "(15, user15, person15@example.com)",
  +      "Executed.", "db > ",
  +    ])
  +  end
但是现在当我们运行这个测例的时候,它实际上发生的是:
  db > select
  (2, user1, person1@example.com)
  Executed.
这很奇怪。它只打印了一行,而且数据看起来发生了损坏(注意输出的 id 和 username 不匹配)。
这个奇怪之处是因为 execute_select() 函数在表的开始位置执行,我们现在的实现 table_start() 函数返回根节点的第0个单元格。但是现在树的跟节点是一个内部节点,它并不包含任何数据行。打印出的数据是根节点当初作为叶子节点时遗留下的。execute_select() 函数应该返回的是最左侧的叶子节点的第0个单元格。
所以现在抛弃旧的实现:
  -Cursor* table_start(Table* table) {
  -  Cursor* cursor = malloc(sizeof(Cursor));
  -  cursor->table = table;
  -  cursor->page_num = table->root_page_num;
  -  cursor->cell_num = 0;
  -
  -  void* root_node = get_page(table->pager, table->root_page_num);
  -  uint32_t num_cells = *leaf_node_num_cells(root_node);
  -  cursor->end_of_table = (num_cells == 0);
  -
  -  return cursor;
  -}
并且添加一个新的实现来搜索 key 0 (可能存在的最小的 key)。即使在表中 key 0不存在,这个方法也会返回最小id的位置(最左叶子节点的开始位置)。
  +Cursor* table_start(Table* table) {
  +  Cursor* cursor =  table_find(table, 0);
  +
  +  void* node = get_page(table->pager, cursor->page_num);
  +  uint32_t num_cells = *leaf_node_num_cells(node);
  +  cursor->end_of_table = (num_cells == 0);
  +
  +  return cursor;
  +}
有了这些修改,测例仍然只打印出一个节点的行数:
  db > select
  (1, user1, person1@example.com)
  (2, user2, person2@example.com)
  (3, user3, person3@example.com)
  (4, user4, person4@example.com)
  (5, user5, person5@example.com)
  (6, user6, person6@example.com)
  (7, user7, person7@example.com)
  Executed.
  db >
有15个条目,B-tree包含了一个内部节点和两个叶子节点,看起来就是下面的样子:
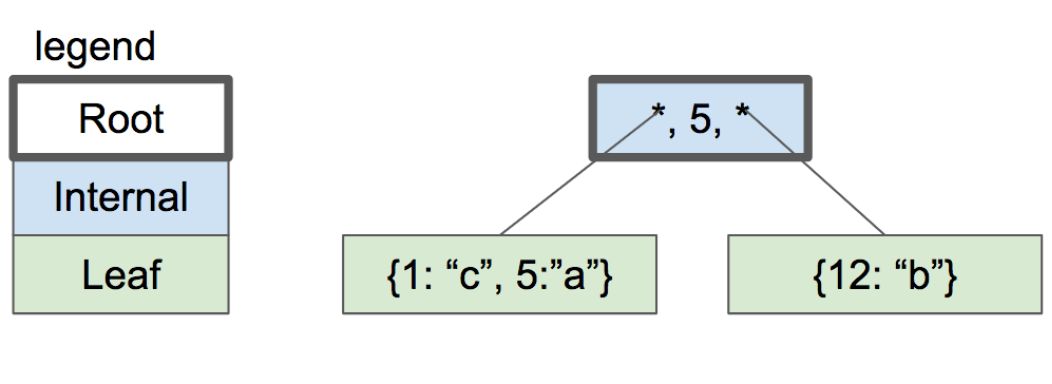
structure of our btree
为了遍历整个表,我们需要在遍历到第一个节点的结尾时跳到第二个叶子节点(继续遍历)。为了能够这样,我们需要在叶子节点的头部保存一个叫做“next_leaf”的字段,这个字段将保存右边兄弟叶子节点的 page number。而最右侧的叶子节点中next_leaf字段将保存 0 值,来表示它没有兄弟节点(无论如何,page 0 是为表的根节点保留的)。
更新叶子节点的头部格式来包含新的字段:
  const uint32_t LEAF_NODE_NUM_CELLS_SIZE = sizeof(uint32_t);
  const uint32_t LEAF_NODE_NUM_CELLS_OFFSET = COMMON_NODE_HEADER_SIZE;
  -const uint32_t LEAF_NODE_HEADER_SIZE =
  -    COMMON_NODE_HEADER_SIZE + LEAF_NODE_NUM_CELLS_SIZE;
  +const uint32_t LEAF_NODE_NEXT_LEAF_SIZE = sizeof(uint32_t);
  +const uint32_t LEAF_NODE_NEXT_LEAF_OFFSET =
  +    LEAF_NODE_NUM_CELLS_OFFSET + LEAF_NODE_NUM_CELLS_SIZE;
  +const uint32_t LEAF_NODE_HEADER_SIZE = COMMON_NODE_HEADER_SIZE +
  +                                       LEAF_NODE_NUM_CELLS_SIZE +
  +                                       LEAF_NODE_NEXT_LEAF_SIZE;
添加一个方法来访问这个字段:
  +uint32_t* leaf_node_next_leaf(void* node) {
  +  return node + LEAF_NODE_NEXT_LEAF_OFFSET;
  +}
在初始化一个新的叶子节点的时候,设置 next_leaf 字段的默认值值为0:
  @@ -322,6 +330,7 @@ void initialize_leaf_node(void* node) {
     set_node_type(node, NODE_LEAF);
     set_node_root(node, false);
     *leaf_node_num_cells(node) = 0;
  +  *leaf_node_next_leaf(node) = 0;  // 0 represents no sibling
   }
每当分裂叶子节点时,更新同级兄弟节点的指针。老叶子节点的兄弟变成了新叶子节点,而新叶子节点的兄弟变成了旧叶子节点的兄弟。
  @@ -659,6 +671,8 @@ void leaf_node_split_and_insert(Cursor* cursor, uint32_t key, Row* value) {
     uint32_t new_page_num = get_unused_page_num(cursor->table->pager);
     void* new_node = get_page(cursor->table->pager, new_page_num);
     initialize_leaf_node(new_node);
  +  *leaf_node_next_leaf(new_node) = *leaf_node_next_leaf(old_node);
  +  *leaf_node_next_leaf(old_node) = new_page_num;
增加几个新的字段,改变几个变量:
  it 'prints constants' do
    script = [
      ".constants",
  @@ -199,9 +228,9 @@ describe 'database' do
      "db > Constants:",
      "ROW_SIZE: 293",
      "COMMON_NODE_HEADER_SIZE: 6",
  -      "LEAF_NODE_HEADER_SIZE: 10",
  +      "LEAF_NODE_HEADER_SIZE: 14",
      "LEAF_NODE_CELL_SIZE: 297",
  -      "LEAF_NODE_SPACE_FOR_CELLS: 4086",
  +      "LEAF_NODE_SPACE_FOR_CELLS: 4082",
      "LEAF_NODE_MAX_CELLS: 13",
      "db > ",
    ])
现在,每当我们想将游标推进到叶子节点的末尾时,就可以检查叶子节点是否有兄弟节点。如果有,跳到兄弟节点。否则,我们就结束在表的末尾。
  @@ -428,7 +432,15 @@ void cursor_advance(Cursor* cursor) {

     cursor->cell_num += 1;
     if (cursor->cell_num >= (*leaf_node_num_cells(node))) {
  -    cursor->end_of_table = true;
  +    /* Advance to next leaf node */
  +    uint32_t next_page_num = *leaf_node_next_leaf(node);
  +    if (next_page_num == 0) {
  +      /* This was rightmost leaf */
  +      cursor->end_of_table = true;
  +    } else {
  +      cursor->page_num = next_page_num;
  +      cursor->cell_num = 0;
  +    }
     }
   }
有了这些更改之后,我们实际上就可以打印 15 行了...
  db > select
  (1, user1, person1@example.com)
  (2, user2, person2@example.com)
  (3, user3, person3@example.com)
  (4, user4, person4@example.com)
  (5, user5, person5@example.com)
  (6, user6, person6@example.com)
  (7, user7, person7@example.com)
  (8, user8, person8@example.com)
  (9, user9, person9@example.com)
  (10, user10, person10@example.com)
  (11, user11, person11@example.com)
  (12, user12, person12@example.com)
  (13, user13, person13@example.com)
  (1919251317, 14, on14@example.com)
  (15, user15, person15@example.com)
  Executed.
  db >
...但是有一行数据好像损坏了。
(1919251317, 14, on14@example.com)在做几次调试之后,我发现问题是因为在分裂叶子节点时的一个bug导致的:
@@ -676,7 +690,9 @@ void leaf_node_split_and_insert(Cursor* cursor, uint32_t key, Row* value) {
void* destination = leaf_node_cell(destination_node, index_within_node);
if (i == cursor->cell_num) {
- serialize_row(value, destination);
+ serialize_row(value,
+ leaf_node_value(destination_node, index_within_node));
+ *leaf_node_key(destination_node, index_within_node) = key;
} else if (i > cursor->cell_num) {
memcpy(destination, leaf_node_cell(old_node, i - 1), LEAF_NODE_CELL_SIZE);
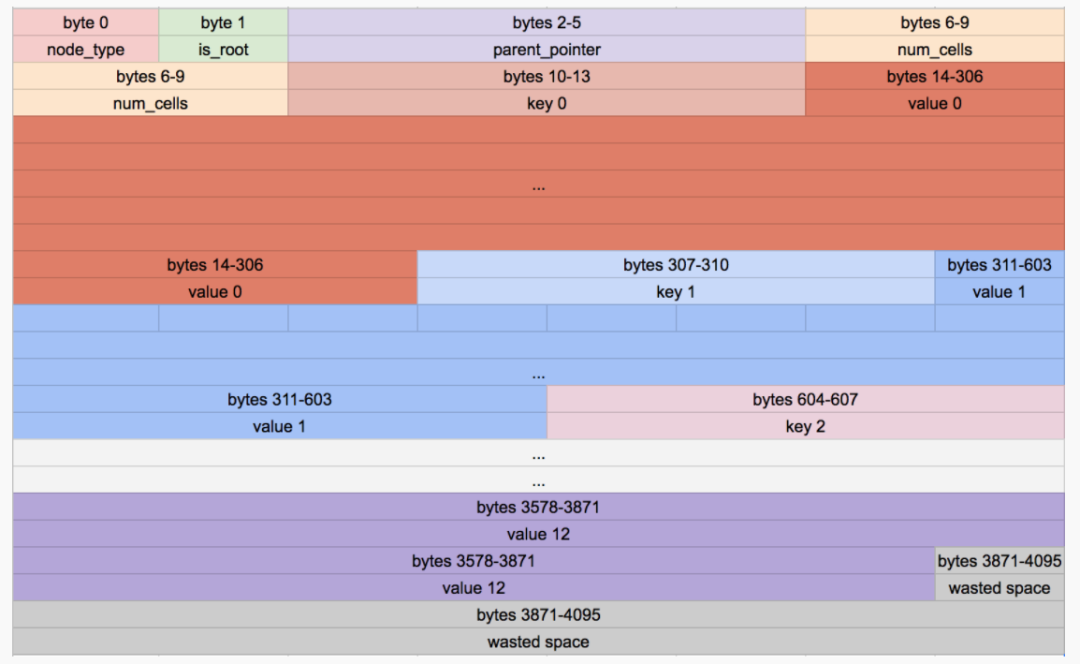
} else {请记住,叶节点中的每个单元格首先包含一个键,然后包含一个值:
Original leaf node format
我们将新行(值)写入单元格的开头,键应该放在那里。这意味着用户名(username)的一部分进入了id部分(因为疯狂的大id)。在修改bug之后,我们终于按预期打印出了整个表格。
  db > select
  (1, user1, person1@example.com)
  (2, user2, person2@example.com)
  (3, user3, person3@example.com)
  (4, user4, person4@example.com)
  (5, user5, person5@example.com)
  (6, user6, person6@example.com)
  (7, user7, person7@example.com)
  (8, user8, person8@example.com)
  (9, user9, person9@example.com)
  (10, user10, person10@example.com)
  (11, user11, person11@example.com)
  (12, user12, person12@example.com)
  (13, user13, person13@example.com)
  (14, user14, person14@example.com)
  (15, user15, person15@example.com)
  Executed.
  db >
哇哦!一个又一个BUG,但我们正在取得进展。直到下次。
合作电话:010-64087828
社区邮箱:greatsql@greatdb.com